


Raised bed gardens may require a bit more investment upfront, but they're a fantastic way to bring some veggie and flower plots into your yard. They provide clean, nutrient-rich soil on day one, give you a space with fewer weeds and pests (like those pesky snails), and are generally easier to manage. Plus, raised bed gardens are a treat for the eyes with their neat, defined edges, and the pathways are easy to maintain.
If you're excited to get started on your raised garden bed and start planting, here are some handy tips to ensure a fruitful summer!
The Benefits of Raised Bed Gardening
As the saying goes, "there's more than one way to cook an egg," or in this case, plant a garden. Success doesn't come from just one path. One of the best things about gardening is that every seasoned gardener has their own take on it, and many share these wonderful benefits of raised bed gardening.
Better On The Body
Give your back and knees a break with less bending and kneeling! While some raised beds are just 6-12 inches off the ground, you can customize your raised garden bed to be the perfect height for you. With a taller bed, you'll spend less time bending over and won't have to kneel as much, whether it's a container with legs or a taller box. Plus, if your bed is less than four feet wide, you'll find it much easier to reach and tend to your plants without stretching too far.
Improves Drainage
With raised garden beds, you get to choose the soil and amendments; the natural environment doesn't choose it for you. In the Intermountain West, soils can range from sandy to clay, depending on where you are. Clay or densely packed soils do not drain well, even after tilling. But don't worry! Your garden will thrive when you fill your raised garden bed with a blend of quality soils that let water flow just right.
Reduces Weeds
Raised garden beds get off to a clean start when you use bagged soils and amendments such as fully composted materials. It's best to skip top soils and steer manures (or other amendments that aren't fully composted) since they might still contain weed seeds. While this gives you a head start, weeds can still pop up. To give your plants an extra layer of protection, think about adding some mulch—like Nutri-Mulch—and a plastic or weed barrier around them. These additions help keep weeds at bay, so they don't compete with your veggies for water and nutrients. And if a few weeds do show up, you'll have fewer than in a regular garden, and they'll be much easier to pull out thanks to the lighter, well-drained soil.

Avoids Tilling
Raised garden beds are easy to maintain with little to no tilling needed. It's a great idea to mix in some compost during the fall or early spring to give your soil a nutrient boost. But if you prefer a no-till approach to avoid disrupting the soil, just layer some compost or mulch on top. The nutrients will naturally seep into the soil instead of washing away. Plus, adding mulch does double duty by feeding your plants and keeping those pesky weeds at bay. It might take a bit for the mulch to break down, but rest assured, those nutrients will find their way into the soil below.
Reduces Pests
Garden pests, much like those pesky weeds, always seem to find a way, don't they? But by lifting your garden off the ground, you can prevent or at least reduce some pests from crawling up and over the sides. The added height can help keep some of them, like snails or rabbits (depending on the height), from making themselves at home. Plus, using supports, cattle panels, or other vertical gardening methods can help keep those little insects at bay. And if deer or birds are giving you a hard time, you can easily pop some netting or fencing around your raised garden beds for extra protection.

Provides Versatility
Grow your raised garden beds wherever you like, whether you have a sprawling yard or just a cozy deck or patio. Utilize side yards and often little used spaces, or even line them along the back or sides of your backyard fence. You can plant in wooden boxes, metal planters, plastic pots, or even five-gallon buckets. Whatever material or type of raised garden bed you choose, make sure it's free from contaminants such as pressure treated wood. Get creative and start growing in whatever space you have!
Improves Organization
Planning your raised bed garden is a fun way to blend functionality with beauty in your yard. Think about how water will reach your beds—will it come from below or above ground? Picture the paths you'll stroll along between your garden boxes—will they be made of pavers, rock, or mulch? Consider if you'll need a fence around your garden and how you'll easily get to your plants from all sides to pick those delicious fruits and veggies. These are all things to consider, how it looks too! Plan for it to be functional, and if looks matter to you, arrange it to be another beautiful part of your yard.
Betters Your Health
While it's not exclusive to raised bed gardening, planting, caring for, and harvesting your garden can be a wonderful way to ease stress and anxiety. The routine and structure of gardening are like a soothing balm for the mind and soul, and there's nothing quite like the joy of cooking with or sharing your own homegrown goodies!

How To Start A Raised Garden Bed
With all the wonderful benefits of raised bed gardening, it's the perfect moment to start planning. Once you're all set and excited to build your raised beds, here are eight handy tips to get you growing:
1. Choose The Right Location
Pick a sunny spot (at least for half the day) that's easy to reach when you're taking care of your garden and harvesting your crops. Think about using spaces you might not usually use, like side yards. There's no right or wrong choice when it comes to finding the perfect spot for your vegetable and berry gardens—just go with what feels best for you!

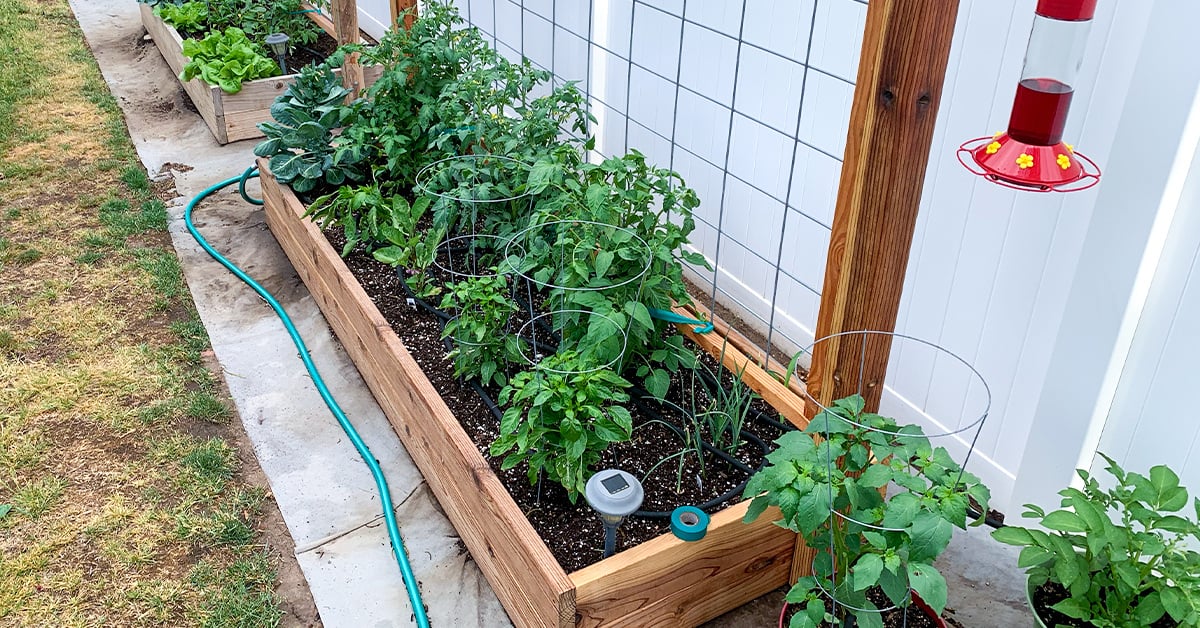
2. Plan The Right Size Raised Garden Bed
Pick a planter or create your raised bed garden up to 4 feet wide from front to back. This way, you can easily reach your veggies within 2 feet without stepping on your soil. Feel free to make it as long as you like. Aim for at least 6 inches deep, but 8-12 inches is even better. Any shape is great—square, rectangle, triangle, or circle. It's your garden, so have fun with it!

3. Quality Soil is Essential
 Gardening success truly starts from the ground up. The healthiest, most productive plants grow in soil that is rich in nutrients. High-quality soil offers nutrients that are easily accessible and quickly absorbed by your plants. For beginners, consider starting a raised garden bed with either (1) a high-quality pre-mixed soil that ensures good drainage or (2) a custom blend of compost and amendments you prepare yourself. Here are a couple of options:
- Ready Mixed Soil: IFA Grow Box Mix (3 cu.ft.) drains well and provides superior results.
- DIY Raised Bed Soil: Combine 1/3 peat moss, 1/3 vermiculite and 1/3 compost. For a specific recipe large enough to make 24 cubic feet of soil–enough for three 4'x4'x6" garden boxes–mix together:
- 1 Bag – Compressed Peat Moss Bale (3.8 cu.ft.)
- 2 Bags – Vermiculite (4 cu.ft.)
- 4 Bags – Oakdell Premium Organic Compost (1 cu.ft.)


4. Choose Your Favorite Vegetables
Start by selecting seeds or transplants for the vegetables you love to eat. You've got a world of options, from Asparagus to Zucchini! Just remember to think about the season when you're choosing, as some veggies do better in early spring, fall, or summer. Also, consider how much space you have and the local weather. Design your garden to fit your style, and why not try growing at least one veggie from seed? Watching your plants grow from seed to harvest is a truly rewarding experience for any gardening fan.
5. Space Your Plants
Every plant needs a little room to grow up big and strong. But don't worry, you won't need wide aisles! With a raised bed garden, you can easily reach each plant from the outside. This means you can fit more veggies into each square foot compared to traditional row gardens. For more tips on spacing, feel free to download and check out our Vegetable Planting Guide!
6. Grow Your Garden Vertically and Save Space
Make the most of your space by trying out some fun ways to grow your vine-type veggies like tomatoes, cucumbers, squash, melons and more! You can use an arch, trellis, tomato cage, pole or cattle panel. A pumpkin vine might usually need 100 square feet, but with a trellis or arch, you can make it work in just 4 square feet! Try pairing up some plant buddies like pole beans and cucumbers on the same trellis. Get creative and have fun with it!

7. Water Your Plants Regularly
Your garden will be thirsty every 2-4 days, so make sure to give it a good drink! The exact timing depends on the type of plants you have, how mature they are and how well your soil drains. Think of it as giving your soil a nice, refreshing drink rather than just a sprinkle to help those roots grow strong and deep. The best methods include drip irrigation, furrow or flood irrigation. Water consistently, but be careful not to overdo it, as too much water can lead to fungus and other issues. To see if your soil needs a drink, just poke your finger one to two inches below the surface to determine if it's really dry.


8. Fertilize To Stimulate Growth
To boost your garden's productivity, make sure to give it a nutrient boost! Just mix them into your existing soil to give it a little recharge, or blend them with new soil to enhance your favorite mix. We suggest trying out IFA 16-16-16 Premium Garden Fertilizer, True Organic Garden Fertilizers or Fertilome Blooming & Rooting Soluble Plant Food 9-58-8. Blooming and Rooting is a liquid fertilizer that you can easily mix into the soil when planting or apply regularly to your plants' leaves to give them a growth boost. For the best results, just check the package for instructions and details.
Start Growing
Swing by your local IFA Country Store to find all the tools and plants you need to make your raised garden bed flourish. Our team is passionate about gardening and eager to lend a helping hand!


